This method of low fidelity prototyping allows for a bit more interactivity than paper prototyping. It allows users to have less creativity in what the prototype is representing.
90 minute practice exercise
I worked with one other student on this short exercise.
The task is to create a voting machine, with the following requirements:
- Allow voters to scan a form of ID (driver’s lisence, passport, etc.)
- Supports voters of visual impairments
- Element of privacy for the voter
- Print out paper record of voter’s choices
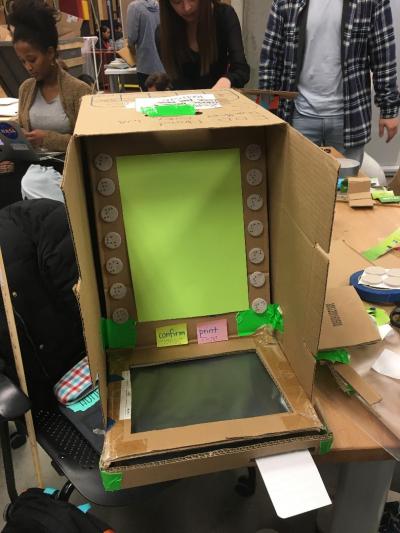
Initial build of the voting maching
We decided on a central screen with buttons on the side, similar to an ATM. This was to allow for the different arrangements of categories, then options or candidates. Not every election is going to have the same number of candidates for the categories. Additionally, we marked these buttons to simulate Braille. Our final version included only the confirm button, which prints out a printed receipt of the voter’s choices (shown on bottom right of machine). The black surface is where the user would scan their identification.

Final build of voting machine
The final component we added to the prototype was the keyboard to allow users to write-in a candidate. After the user scans their identification, they flip down the keyboard for the rest of their experience.
A2: Shower Control
Working by myself, I created a model for a shower control interface. The interface must include:
- 4x4x2 in volume
- Digital display to show temperature, volume, valves
- Easy to use physical affordances
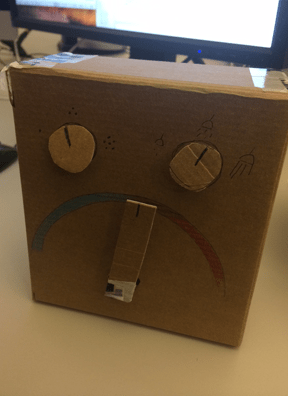
First build of shower control unit
I thought about what I generally like to see with shower controls, so I built a unit that has a turn handle to control the temperature. Designing for water pressure was more difficult, because it’s not something that we see very often in the US. I talk to people from Canada and the UK and they are much more used to seeing a control for water pressure.
In my user test with this model, the user was not sure what to do to turn on the water. (From my understanding having used a shower like this once, both the water pressure and temperature knob need to be turned on.) She also wasn’t sure about the icons that were representing the amount of water coming out of the shower head. A clip from her user test can be seen below.
A few notable things to change for the second iteration is the process of actually turning the shower on. This is the main function of the console and should be much easier to do. As for building 3-D models in general, I would like to look into different methods of creating a handle to turn. In the 90 minute exercise, I saw some really interesting methods of creating slots to insert cards and documents. I think I can also find ways to make effective handles by watching what other people do.
